使い方ガイド Usage guide
インストールから普段の使い方まで、やさしく順を追ってご案内します。
むずかしい知識は必要ありません。CSP で絵を描く方なら、すぐに使い始められます。
From install to daily use, step by step in plain language.
No technical knowledge required — if you draw in CSP, you can start right away.
やることは、たったの 3 つ。 Just three things to do.
-
01
Chro-NOS を起動する Launch Chro-NOS 裏で
.clipを見守る役 It watches your.clipin the background -
02
.clipファイルを登録する Register a.clipfile 最初の 1 回だけ、管理を始める合図 One-time setup, the kickoff -
03
CSP でいつもどおり絵を描く Draw in CSP as usual 保存(Ctrl+S)で履歴が積もる Save (Ctrl+S) builds your history
これだけです。あとはいつもどおり描いていれば、勝手に履歴が残っていきます。詳しい手順は下の各ステップで順番にご案内します。 That's it. Just keep drawing — your history builds itself. Detailed steps follow below.
インストール Install
Windows をお使いの方: For Windows users:
-
ダウンロードページ から
Chro-NOS-0.4.2-win-x64.exeをダウンロードします。 From the Download page, downloadChro-NOS-0.4.2-win-x64.exe. -
ダウンロードした
.exeファイルをダブルクリックします。 Double-click the downloaded.exefile. - 「Windows によって PC が保護されました(SmartScreen)」と表示された場合は、「詳細情報」 → 「実行」 の順にクリックしてください。Chro-NOS は Windows のコード署名に対応していないため、この警告が出ます。 If you see "Windows protected your PC (SmartScreen)", click "More info" → "Run anyway". This warning appears because Chro-NOS is not code-signed.
- 画面の指示に従ってインストールを完了します。 Follow the on-screen prompts to complete installation.
macOS をお使いの方: For macOS users:
-
ダウンロードページ からお使いの Mac に合った
.dmgファイルをダウンロードします。Apple Silicon(M1/M2/M3/M4)の Mac はarm64.dmg、Intel Mac はx64.dmgです。 From the Download page, download the.dmgfor your Mac. Usearm64.dmgfor Apple Silicon (M1/M2/M3/M4), orx64.dmgfor Intel Macs. -
.dmgファイルを開き、Chro-NOS のアプリアイコンを Applications フォルダにドラッグします。 Open the.dmgand drag the Chro-NOS icon into the Applications folder. - 初回のみ、Applications フォルダ内の Chro-NOS アイコンを 右クリック → 「開く」 を選んで起動してください。「開発元を確認できない」というメッセージが出ても、もう一度「開く」を押せば起動できます。Chro-NOS は Apple の公証に対応していないため、この手順が必要です。 For the first launch only, right-click the Chro-NOS icon → "Open". If you see a "developer cannot be verified" message, click "Open" again. This is required because Chro-NOS is not Apple-notarized.
- 2 回目以降はダブルクリックで起動できます。 From the second launch on, just double-click as usual.
初回起動と .clip の登録
First launch & registering a .clip
Chro-NOS をはじめて起動すると、最初に 言語の選択(日本語 / English)や、カラーモード・通知音などの初期設定画面が表示されます。利用統計は 初期は ON になっており、設定画面からいつでもオフに切り替えていただけます。送信されるのは匿名化された情報のみで、個人を特定する内容は含まれません。 The very first time you launch Chro-NOS, you'll be asked to choose a language (Japanese / English) along with color mode and notification sounds. Anonymous usage analytics are ON by default and can be turned off any time from Settings. Only anonymized data is sent.
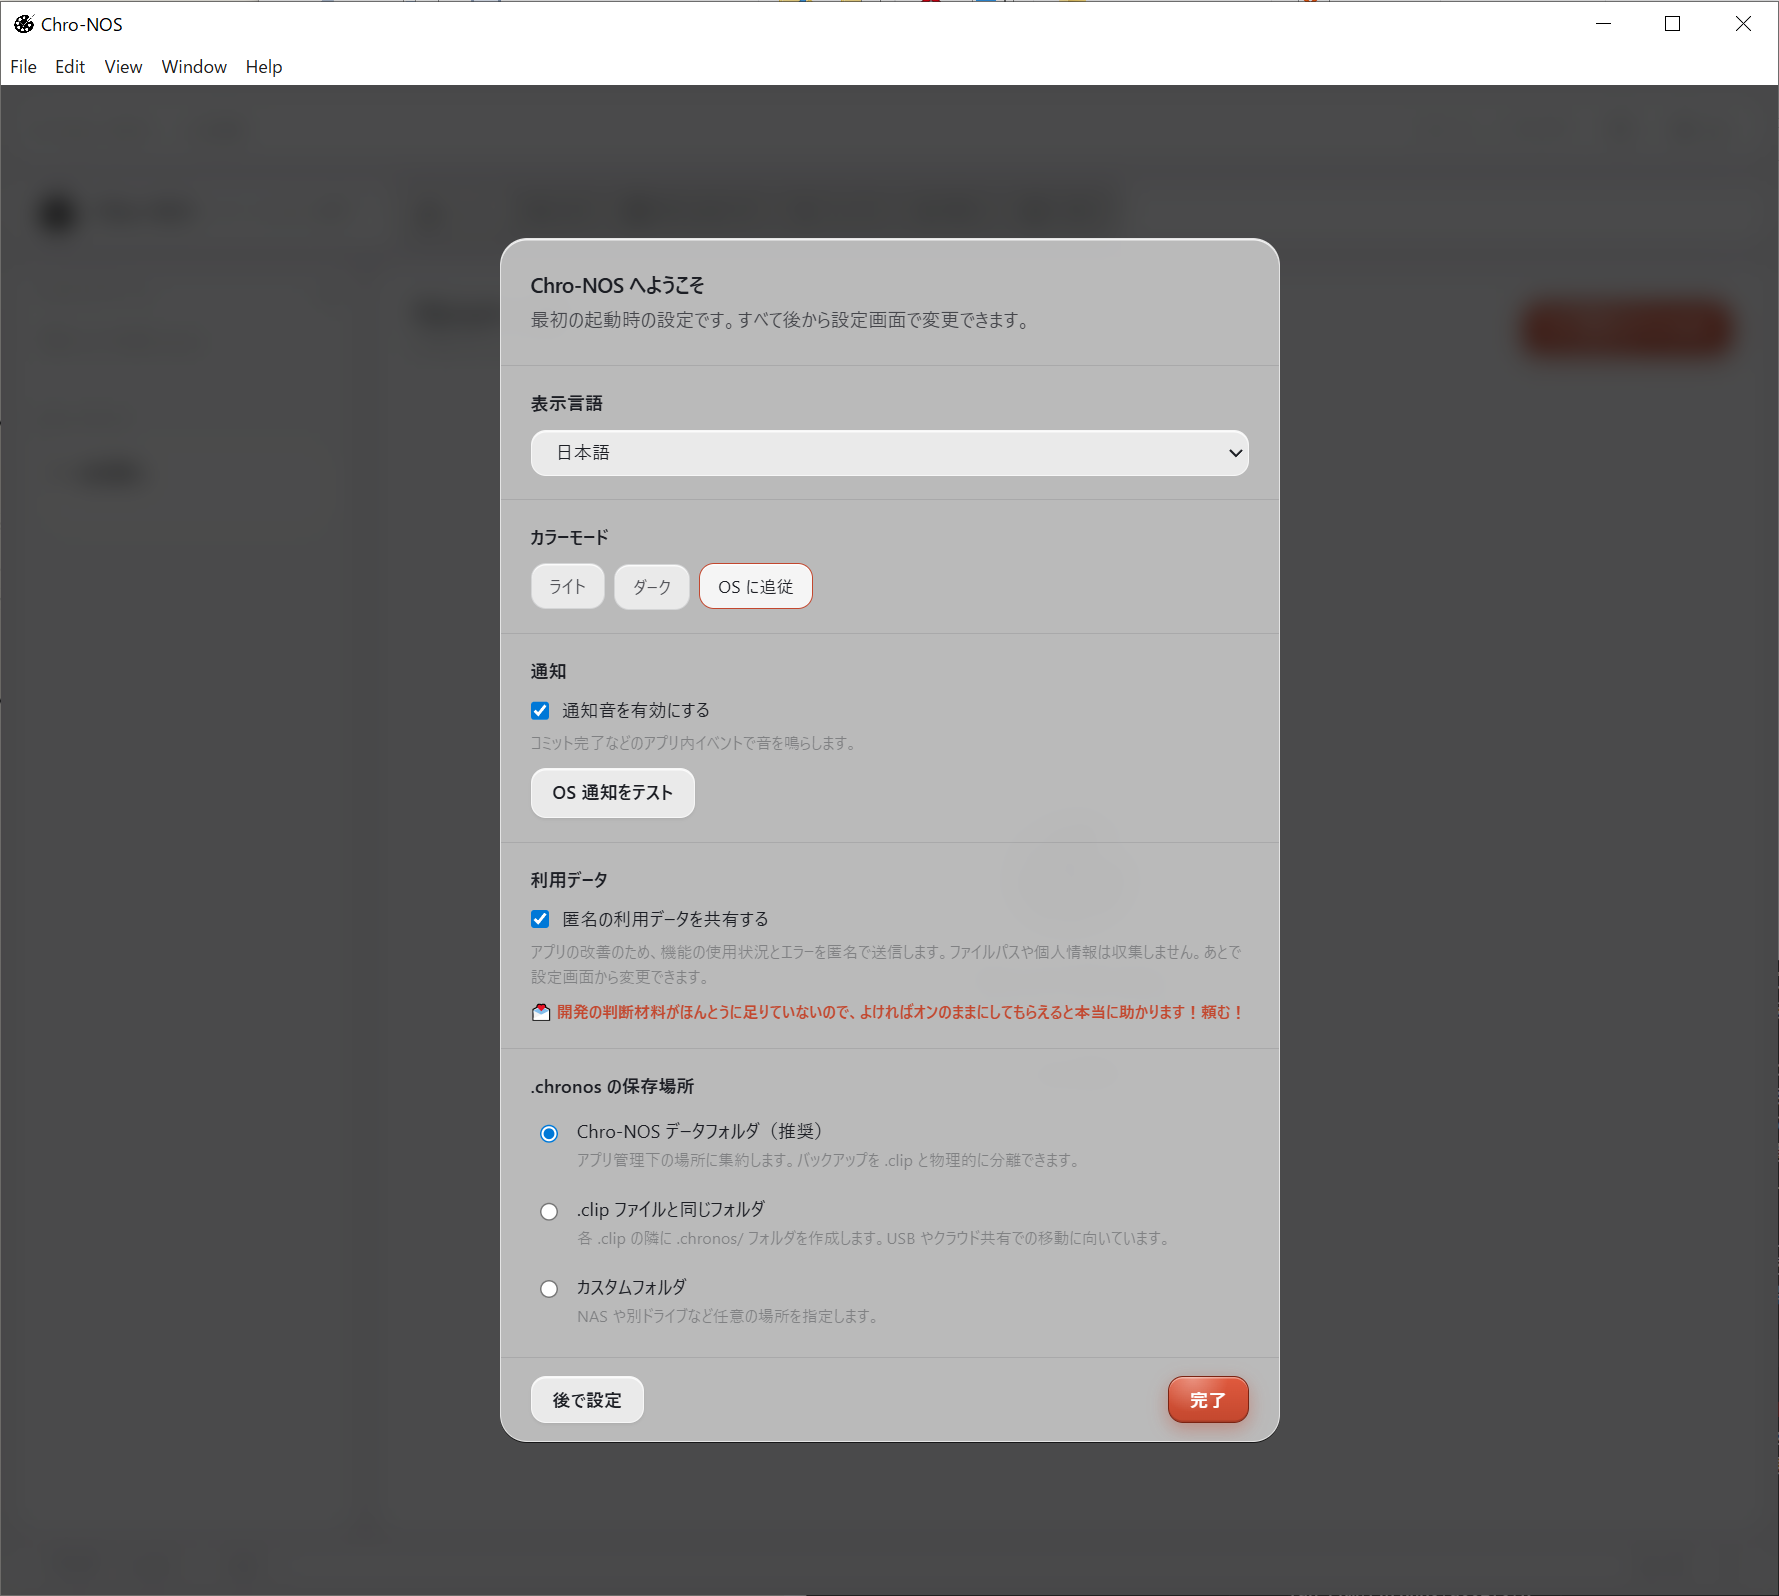
はじめて起動したときの画面(言語・カラーモード・通知などの初期設定) First launch — language, color mode, and notifications setup.
そのあと、管理したい .clip ファイルを登録します。やり方は次の 2 通りのどちらでも大丈夫です。
Next, register the .clip file you want to manage. There are two ways — either works.
-
方法 A: Chro-NOS のホーム画面から
.clipファイルを選んで登録する。 Option A: From the Chro-NOS home screen, pick the.clipfile you want to register. -
方法 B: Chro-NOS を起動したまま、CLIP STUDIO PAINT で
.clipファイルを開きます。Chro-NOS が自動でそのファイルに気づき、「このファイルの管理を開始しますか?」 と尋ねてくれます。「はい」を選べば登録されます。 Option B: Keep Chro-NOS running, then open a.clipfile in CLIP STUDIO PAINT. Chro-NOS notices it automatically and asks "Start managing this file?" — click yes to register.
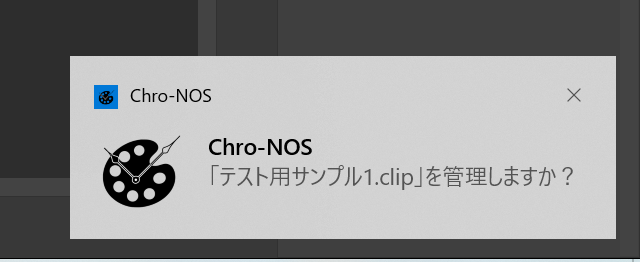
方法 B: CSP で .clip を開いた直後に表示されるポップアップ
Option B: the popup shown right after opening a .clip in CSP
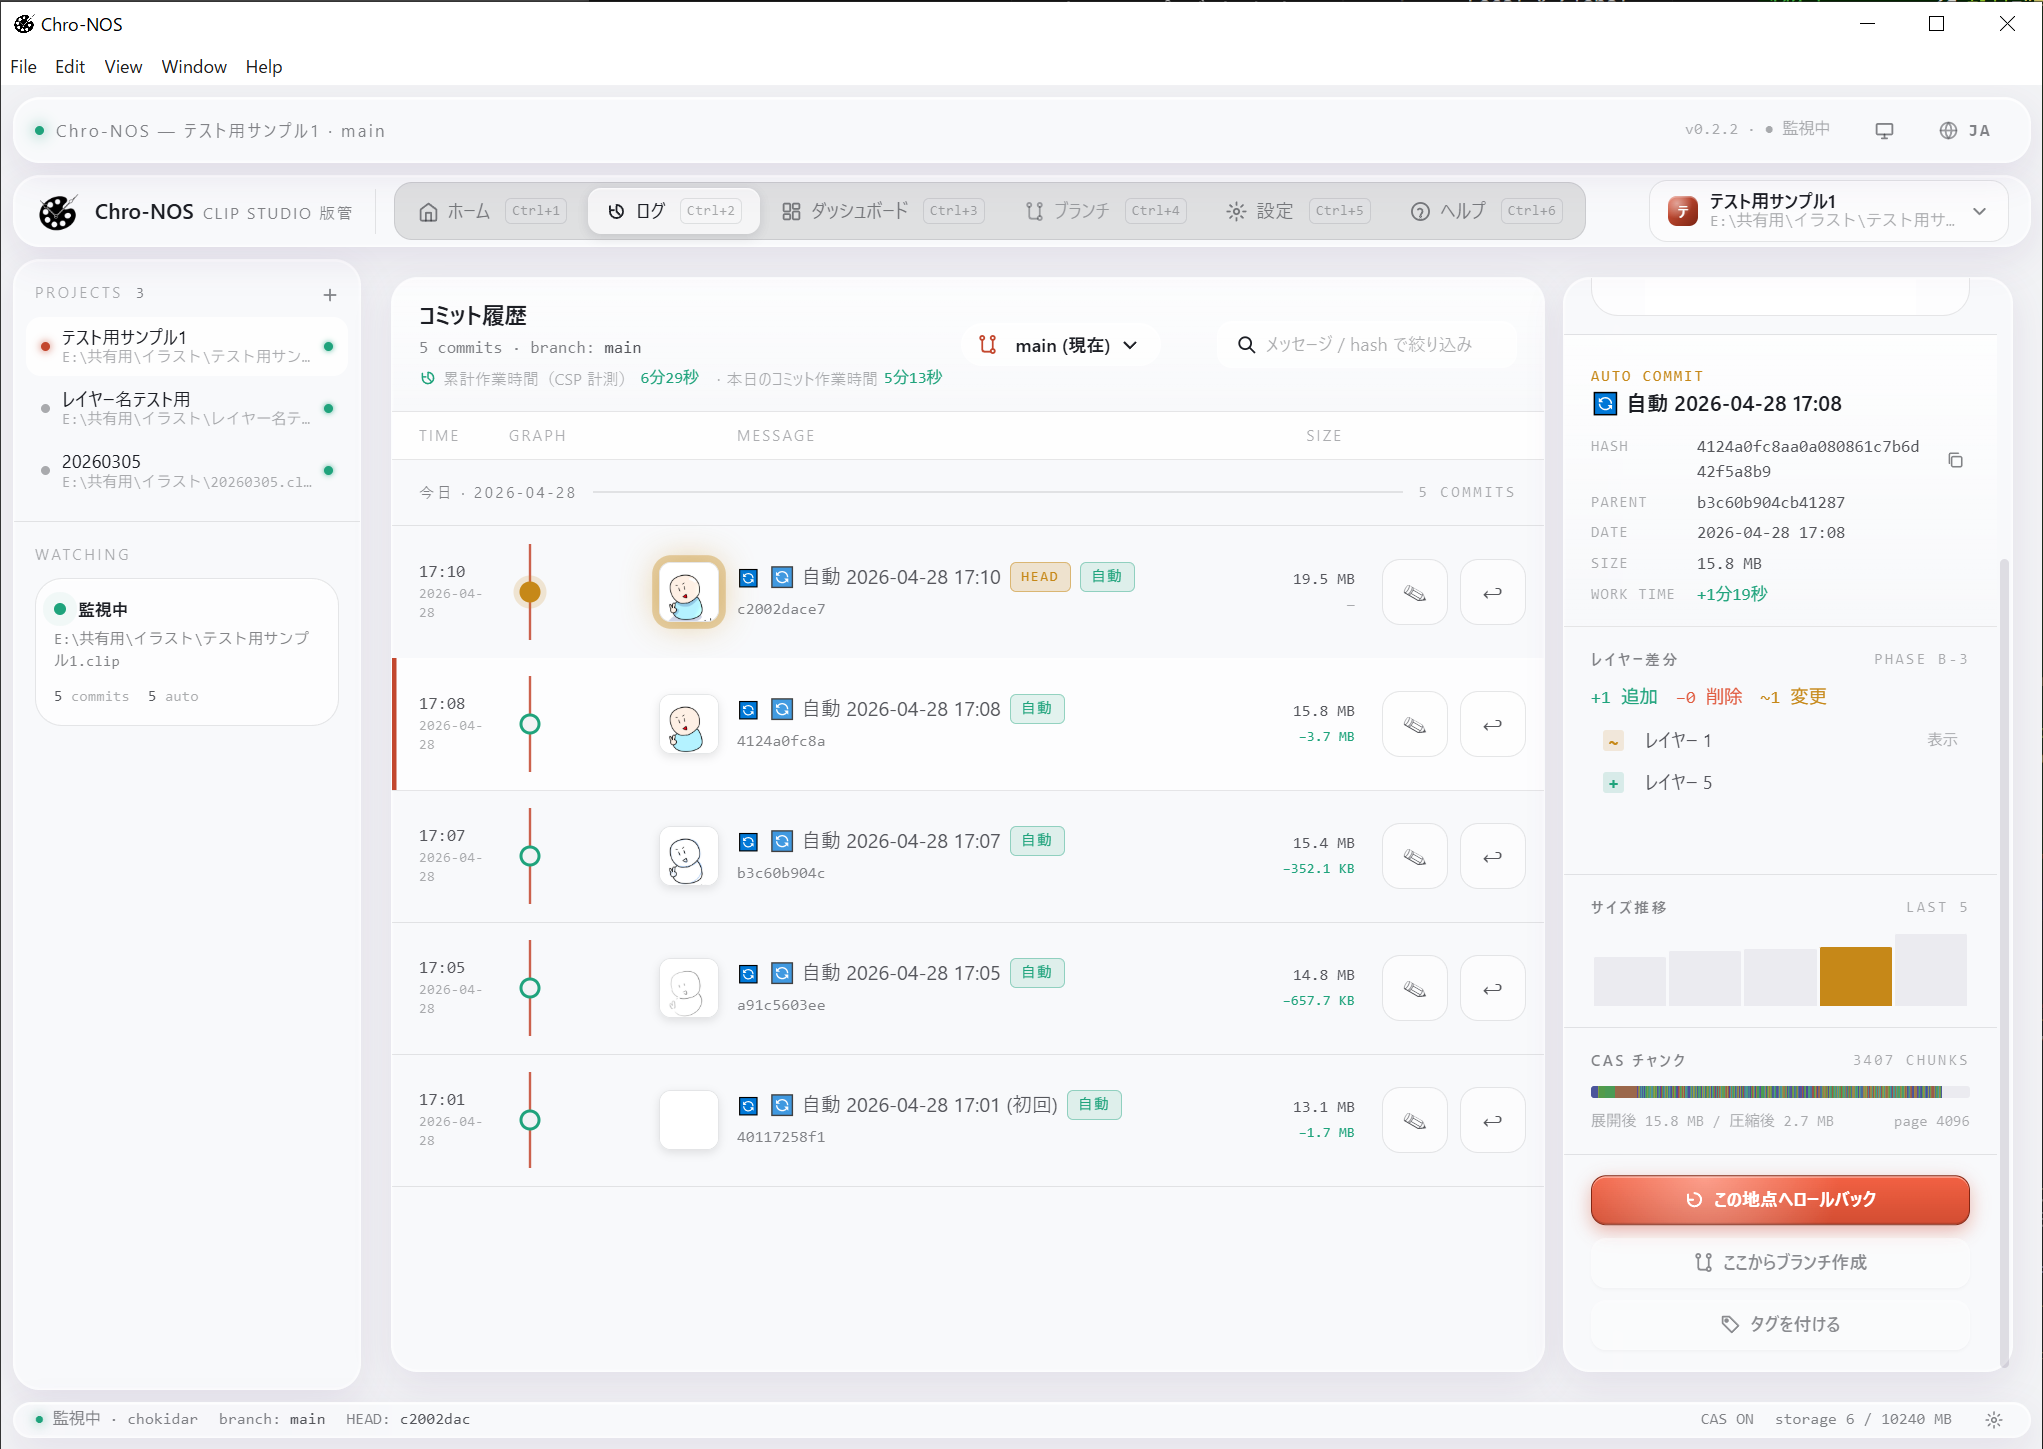
どちらの方法でも、登録された時点で 初回のコミット(履歴の記録)が自動で作成されます。同時に、ファイルの隣に .chronos/ フォルダが作られ、ここに作業履歴が保存されていきます。
With either option, the first commit (history snapshot) is created automatically on registration. A .chronos/ folder is also placed next to the file — that's where your history lives.

登録直後のログ画面 — 初回コミットが自動で入っているのが見えます Log right after registration — the automatic first commit is already there.
普段の使い方 Daily use
あとは普段どおり、CLIP STUDIO PAINT で絵を描いて、Ctrl + S(Mac は ⌘ + S)で保存するだけです。保存した瞬間に履歴が 1 つずつ積み重なっていきます。本当にこれだけです。 From here on, just draw in CLIP STUDIO PAINT as usual and save with Ctrl + S (or ⌘ + S on Mac). Each save adds one entry to your history. That's all there is to it.
Chro-NOS のアプリ画面を開いて何かを操作する必要はありません。描くことだけに集中していただけます。短い間隔で何度も保存した場合は、まとめて 1 つの履歴にまとめられることがあります。 You don't need to open the Chro-NOS app or click anything — just keep drawing. If you save many times in quick succession, those saves may be grouped into a single history entry.
もちろん、節目には自分の手で Ctrl + S を押すのが一番確実です。 Now resilient to forgotten saves: Chro-NOS still logs history primarily at the moment you save (Ctrl + S) in CLIP STUDIO PAINT, but starting from v0.3.0 it also includes auto-save coordination with CLIP STUDIO PAINT's "Canvas Recovery" feature. If you work for a long stretch without saving, or CLIP STUDIO PAINT crashes unexpectedly, an "Auto Save" card appears at the top of the log page and lets you restore your work in one click.
It's still best to hit Ctrl + S at meaningful checkpoints when you can.
節目にメッセージを残したい時は: Chro-NOS のアプリ画面から「下書き完成」「配色トライ A」のようなメッセージを付けて、手動でコミット(履歴に名前をつけて残すこと)することもできます。あとから振り返るときの目印になります。 When you want to mark a milestone: From the Chro-NOS app you can also add a manual commit (a named history entry) with a message like "sketch done" or "palette A attempt". It becomes a useful landmark when looking back.
ウィンドウを閉じても大丈夫です: Chro-NOS のウィンドウを閉じても、アプリは裏側でそのまま動き続けます。次に CLIP STUDIO PAINT で保存したときも、ちゃんと履歴を残してくれますので、安心してウィンドウを閉じていただけます。
完全に終了させたい場合は、タスクトレイ(Mac はメニューバー)の Chro-NOS アイコンを右クリックして「終了」を選んでください。
Closing the window is fine: Even after you close the Chro-NOS window, the app keeps running quietly in the background, so the next save in CLIP STUDIO PAINT will still be recorded. You can close the window without worry.
To fully quit, right-click the Chro-NOS icon in the task tray (or the menu bar on Mac) and choose "Quit".
過去に戻したい時(ロールバック) When you want to go back (rollback)
「あの配色のほうがよかった」「下書きの状態に戻したい」と思ったら、次の手順で戻せます。 If you want to go back ("the earlier palette was better", "back to the sketch stage"), here's how:
-
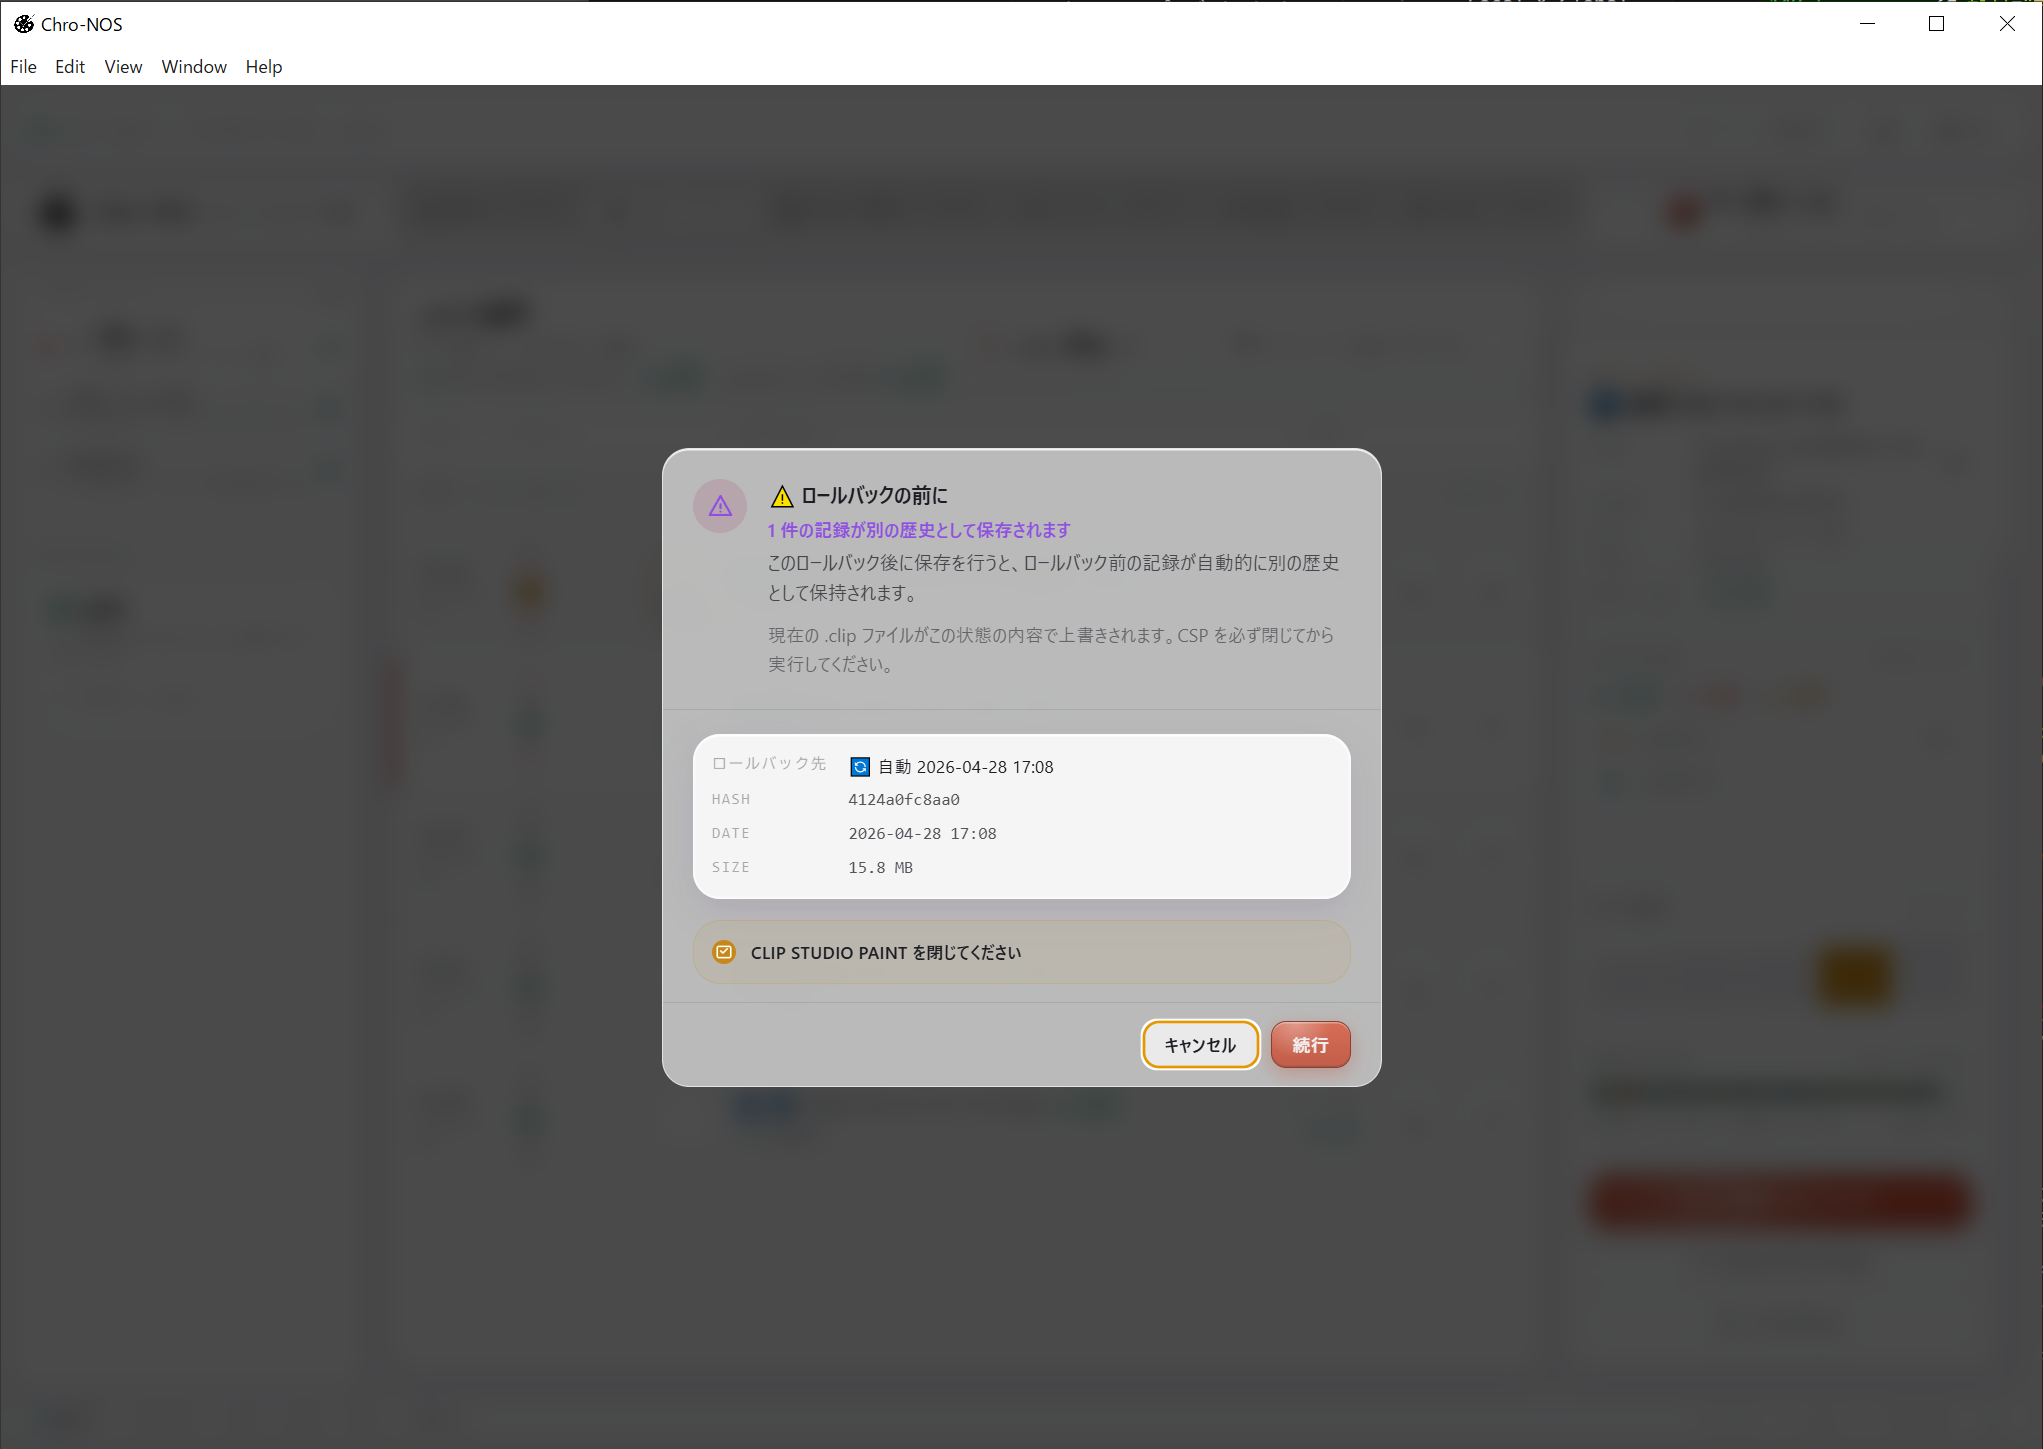
まず、対象の
.clipファイルを CLIP STUDIO PAINT で閉じます。CLIP STUDIO PAINT は開いているファイルをロックする仕様のため、開いたままだと書き戻しができません。 First, close the target.clipin CLIP STUDIO PAINT. CSP locks any file it has open, so the rollback can't overwrite it while it's open. -
Chro-NOS のアプリ画面を開き、対象の
.clipの 「ログ」タブを選びます。 Open the Chro-NOS app and select the Log tab for the relevant.clip. - 戻したい時点のコミット(履歴の記録)を選びます。サムネイル画像を見ながら選べます。 Pick the commit (history entry) you want to restore. Thumbnails are shown to help you choose.
-
「この地点へロールバック」を選ぶと、
.clipファイルがその時点の状態に上書きされます。 Choose "Rollback to this point", and the.clipfile is overwritten with the state at that point in time. -
あとは、その
.clipを CLIP STUDIO PAINT で開き直すだけです。戻した時点の状態から作業を続けていただけます。 Then just open that.clipagain in CLIP STUDIO PAINT. You can pick up your work from the restored state.
複数の .clip を管理する
Managing multiple .clip files
必要に応じて、他の .clip ファイルも追加で管理することができます。最大 10 個までの .clip を同時に管理できます。
You can add more .clip files to manage as needed. Up to 10 files can be managed at once.
CSP で新しい .clip を開いて保存すると、Chro-NOS が自動でファイルに気づき、「このファイルも管理しますか?」と尋ねてくれます。「はい」を選ぶだけで、そのファイルも履歴管理の対象になります。
When you open and save a new .clip in CSP, Chro-NOS notices it automatically and asks "Manage this file too?". Just click yes to start tracking it.
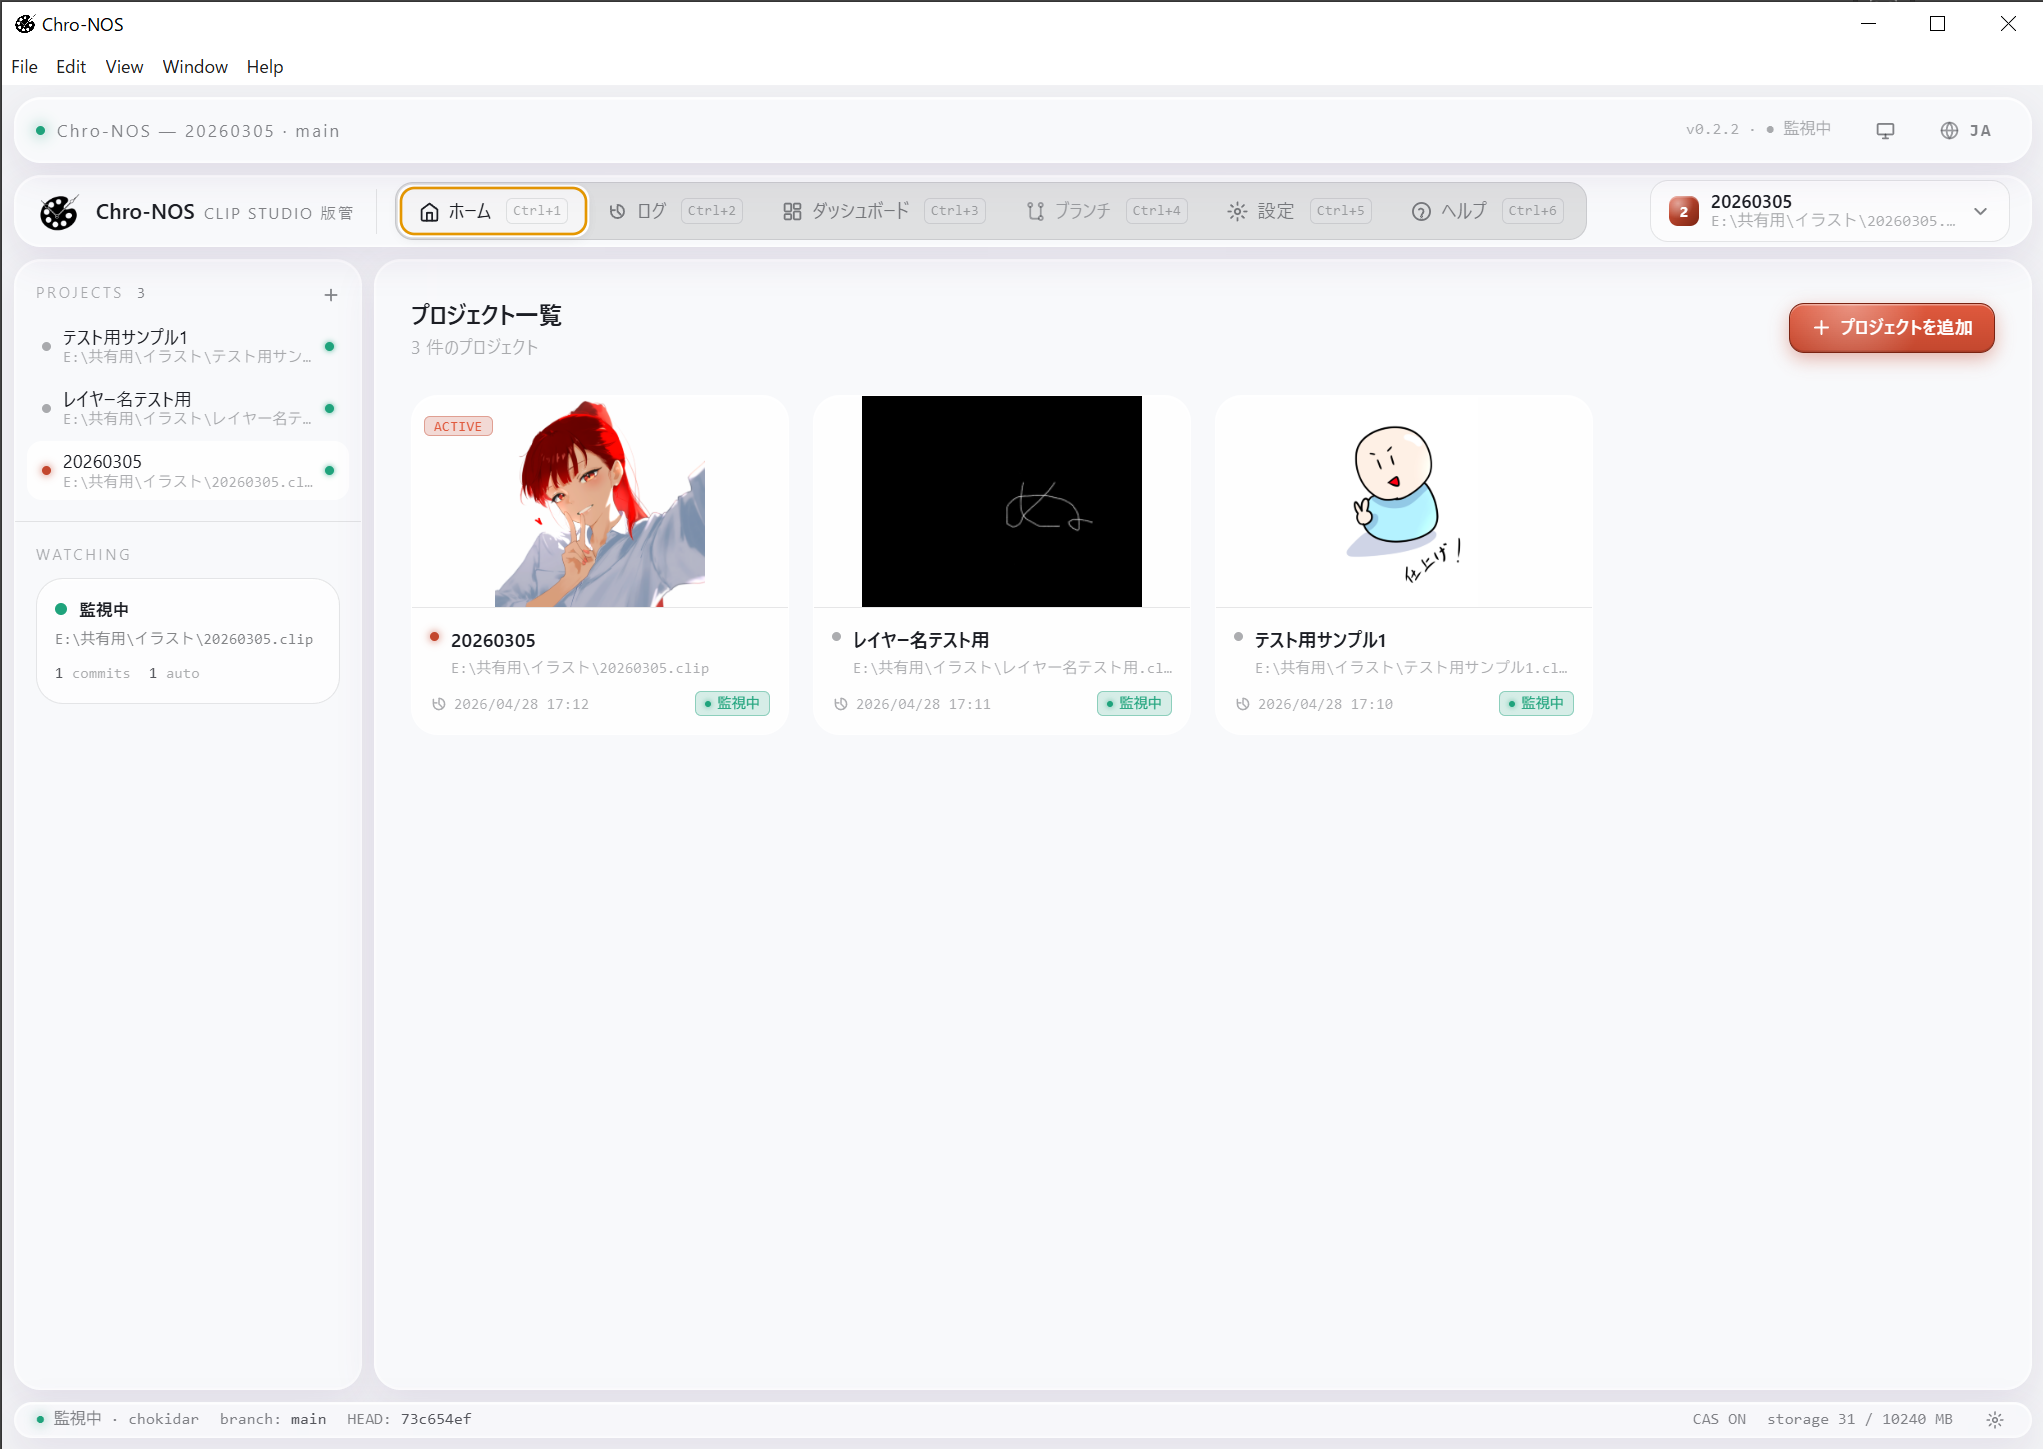
ホーム画面では、登録した .clip プロジェクトが一覧で並びます
The home screen lists all registered .clip projects.
制作の歩みを振り返る Looking back on your work
アプリ画面の 「制作ダッシュボード」タブ を開くと、累計作業時間・レイヤー構成・保存ごとの履歴がグラフで一覧できます。 Open the Dashboard tab in the app to see your total work time, layer structure, and save-by-save history as charts.
「今日 / 今週 / 今月 / 今年 / 全期間」と切り替えながら、自分の制作を俯瞰できます。1 つの .clip 単位でも、複数プロジェクトを横断するビューでも見られます。
Switch between Today / Week / Month / Year / All Time to look back on your practice. Available per-project, or across all your projects.
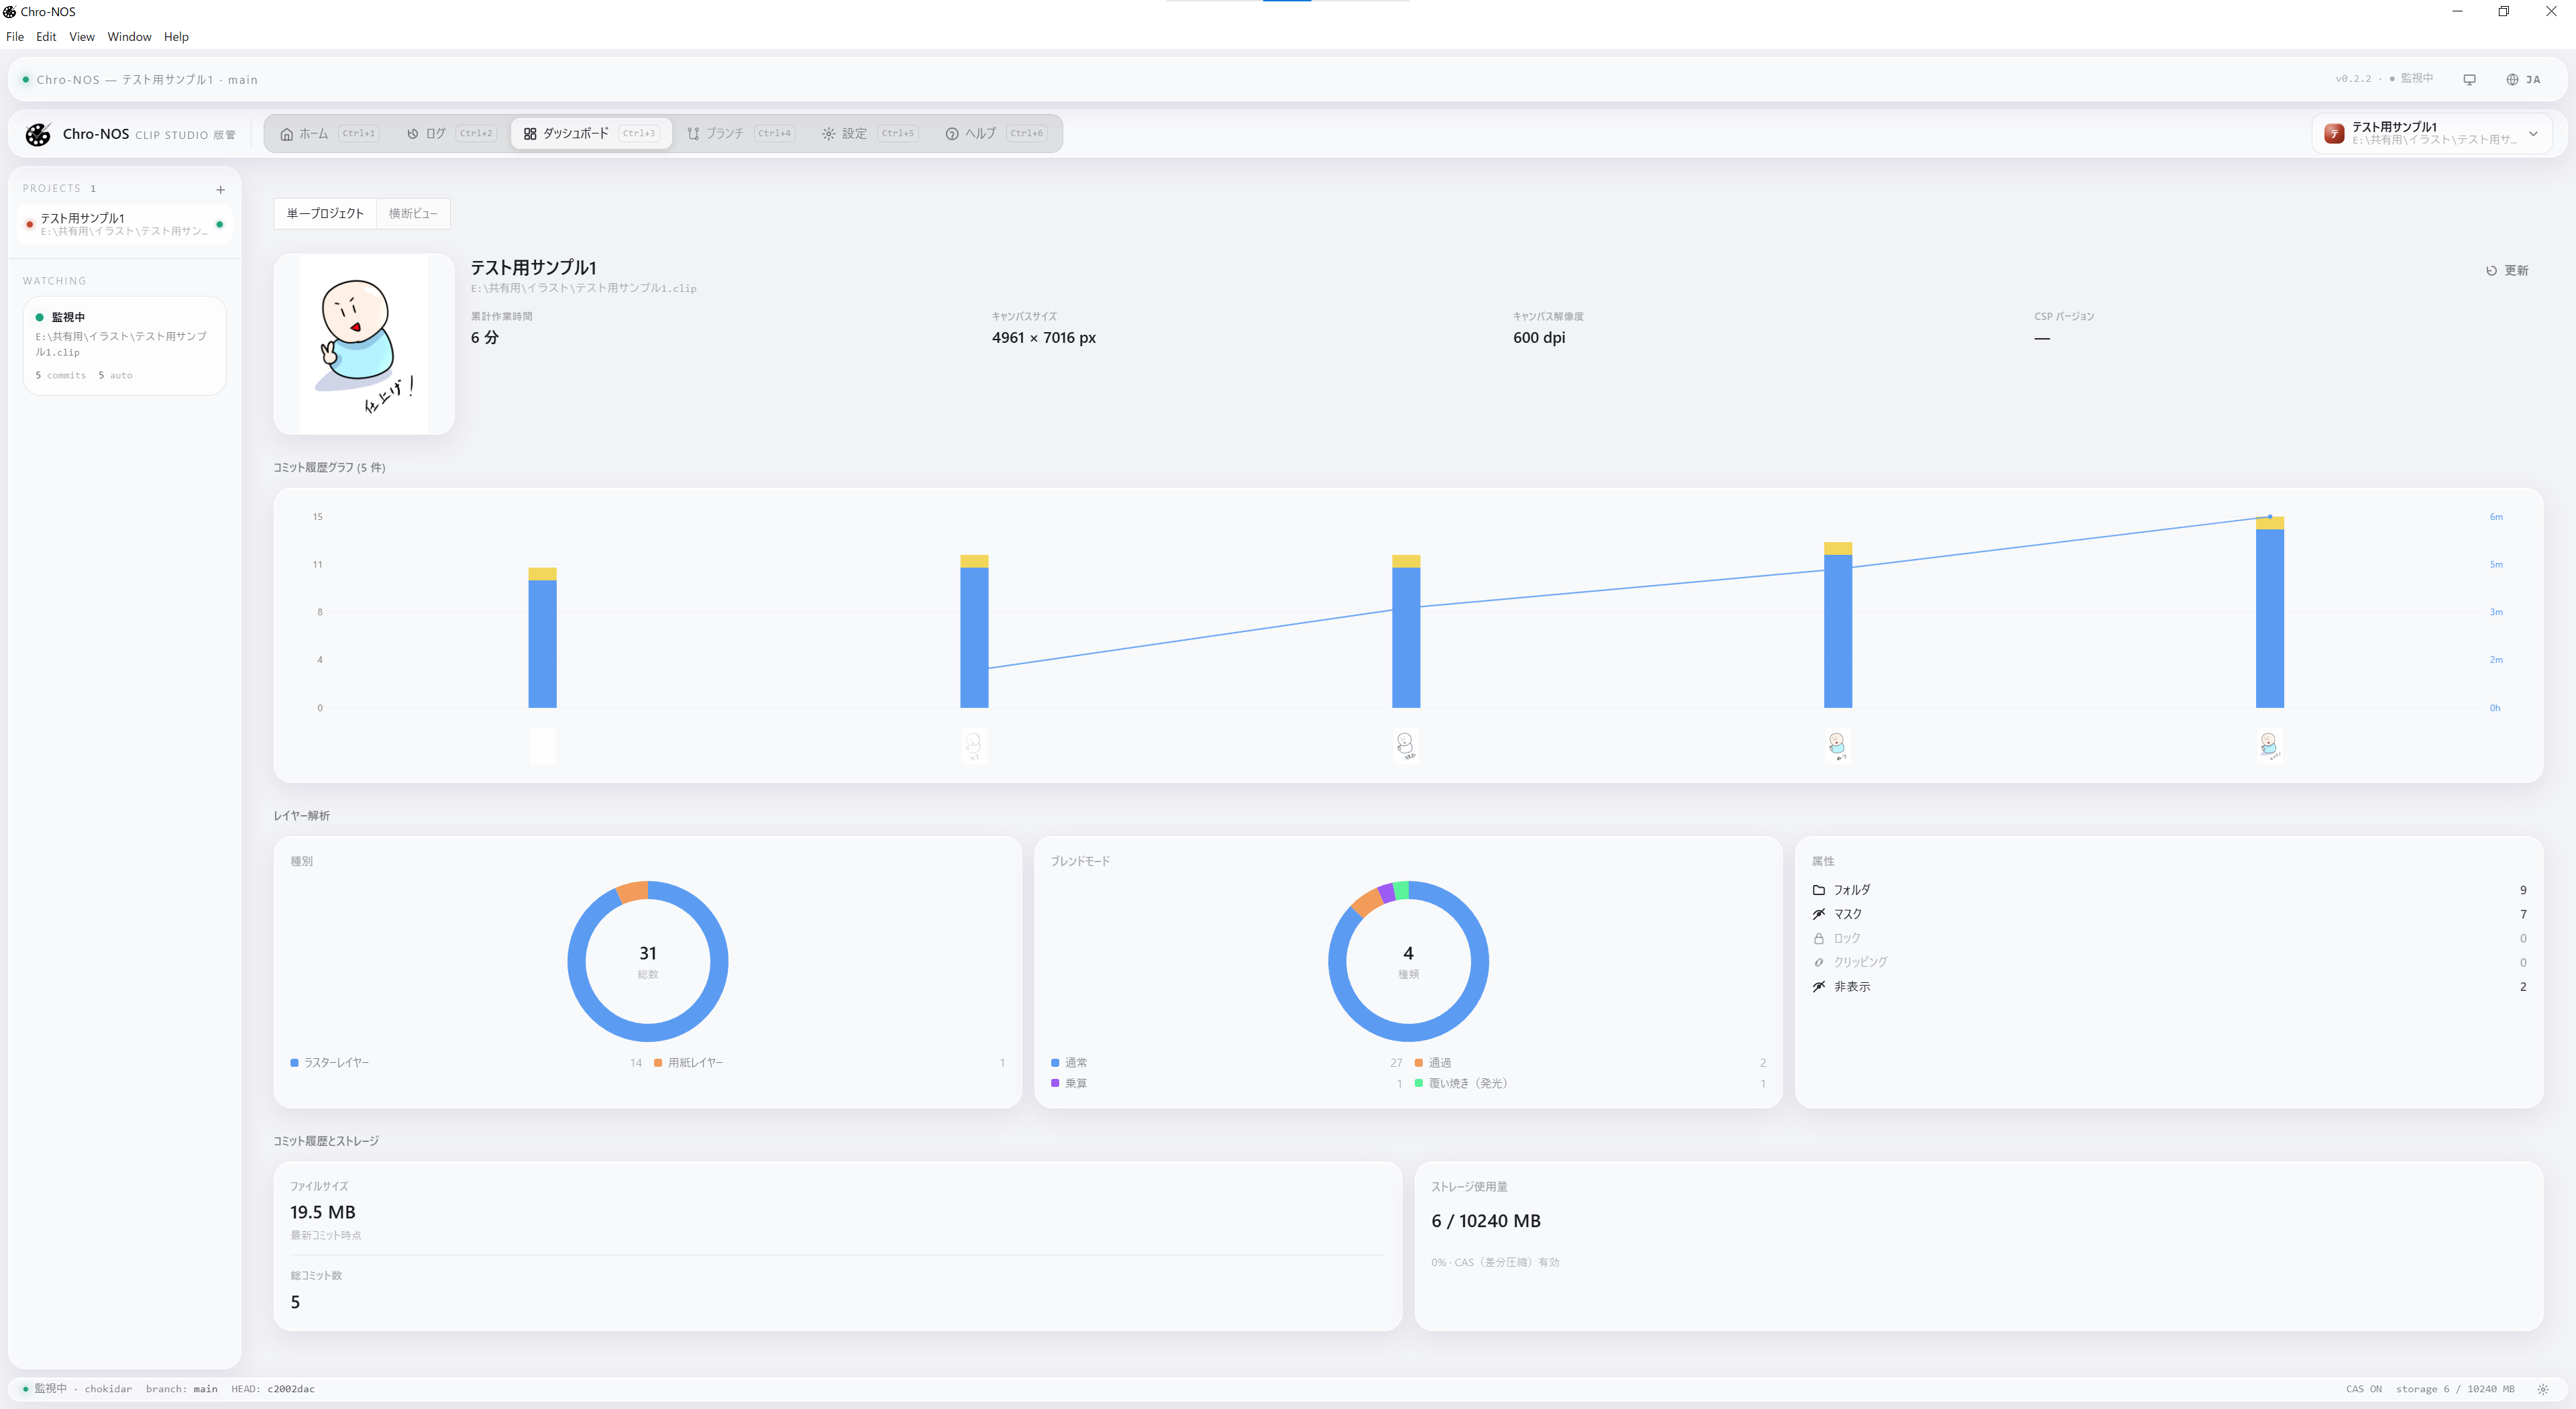
制作ダッシュボード — 累計作業時間・レイヤー構成・保存履歴を一覧 Dashboard — total work time, layer structure, and history at a glance.
困ったら If you need help
不具合に遭遇したり、機能の要望があったりした場合は、アプリ内の 「ヘルプ」タブからフィードバックを送れます。カテゴリ(バグ / 機能要望 / その他)を選んで、匿名で送信できます。 If you encounter a bug or have a feature request, send feedback from the Help tab in the app. Pick a category (bug / feature request / other) and submit anonymously.
アプリをインストールせずにご連絡したい場合は、公式サイトのコンタクトフォーム もご利用いただけます。 To reach us without installing the app, you can also use the contact form on our website.
よくある質問は FAQ ページ にまとめています。 Common questions are answered on the FAQ page.
安全に使うために To use it safely
重要: Chro-NOS は履歴を残す手助けをするツールですが、データの完全な復旧を約束するものではありません。アプリの不具合、ハードディスクの故障、その他の理由でデータが取り出せなくなる可能性は常にあります。
大切な .clip ファイルは、Chro-NOS とは別に必ず別のバックアップ(クラウドストレージ、外付けドライブ、別フォルダへのコピーなど)を取ってください。
Important: Chro-NOS helps you keep a history, but it does not guarantee full data recovery. App bugs, hardware failures, or other unforeseen events can always make data unrecoverable.
For important .clip files, always keep a separate backup (cloud storage, external drive, another folder, etc.) outside Chro-NOS.
個人開発の β 版アプリですので、何か起きた場合に責任をお取りすることはできません。あくまで「自分の作業履歴をなんとなく残しておくための補助ツール」としてお使いいただけると幸いです。 As a beta version of a solo-developed app, I (COHI Studio) cannot take responsibility for any issues. Please use it as a supplementary tool to keep a casual record of your work, not as a primary backup.